6.7 Cummins EGR Delete (You don't have to be a mechanic)
heyo, so the purpose of this video is to show you that you don’t have to be mechanic to perform an EGR delete, a CC, be delete or a DPF delete, and you don’t have to pay somebody five hundred dollars or more to do it. I am by no means anywhere close to being a mechanic. I changed my own old associated filters. I have a very basic understanding of engines and I know how to use a wrench. That’S all.
This is an easy procedure that doesn’t require you to get inside the engine. However, it is time consuming. This is the first time that I’ve did this and it took me about six hours, but a lot of it was because I was videoing and I had a bracket that was made for an older truck and I had to cut it with an angle grinder. A couple of times, finally, I’m not a videographer, and I can’t claim to be this is my first youtube video and I hope it helps somebody out, but I’m not gon na win an Emmy off of this or whatever them awards are so along the same lines. I also can’t take responsibility if you do something and screw up your truck.
click image to shop egr delete kit
Alright y’all welcome to my garage the other day I did the DPF delete. It was really straightforward. Basically, if there’s a plug going in the tailpipe unplug it I bagged it taped it up, and then you just take down the pipes, it’s pretty straightforward. You have to do some wrestling out now. The other thing before I could run some tunes.
You had to do the EGR delete or unplug the EGR, so I hadn’t done the EGR delete. Yet it’s what I’m gon na do today, but I’m going to show you the plugs that I had to undo in order to be able to run the tunes. So, first off right here on the EGR valve, I had to unplug this one and then there was a sensor that goes into the EGR crossover here, plug that one. This one went, let’s see no back down here behind I don’t know. If I get there and see it, let’s see way back behind here there is a plug or there was a plug, and I unplugged that one it was actually really kind of difficult to get to.
It was alright this one right here I had to unplug that one and basically had to sit tied him up and taped him up zipped on them, so that way they stay safe. In case, I need to focus as out in case. I need to put it back together sometime if I have any issues, so my project for the day is to actually do the EGR delete. Now I’m going to choose to keep all my stuff in a box in the Attic in case something happens to my truck while still under warranty, although only have maybe 50,000 miles left on the warranty, but something could happen. So that’s what I’m going to do and we’ll go over it later on.
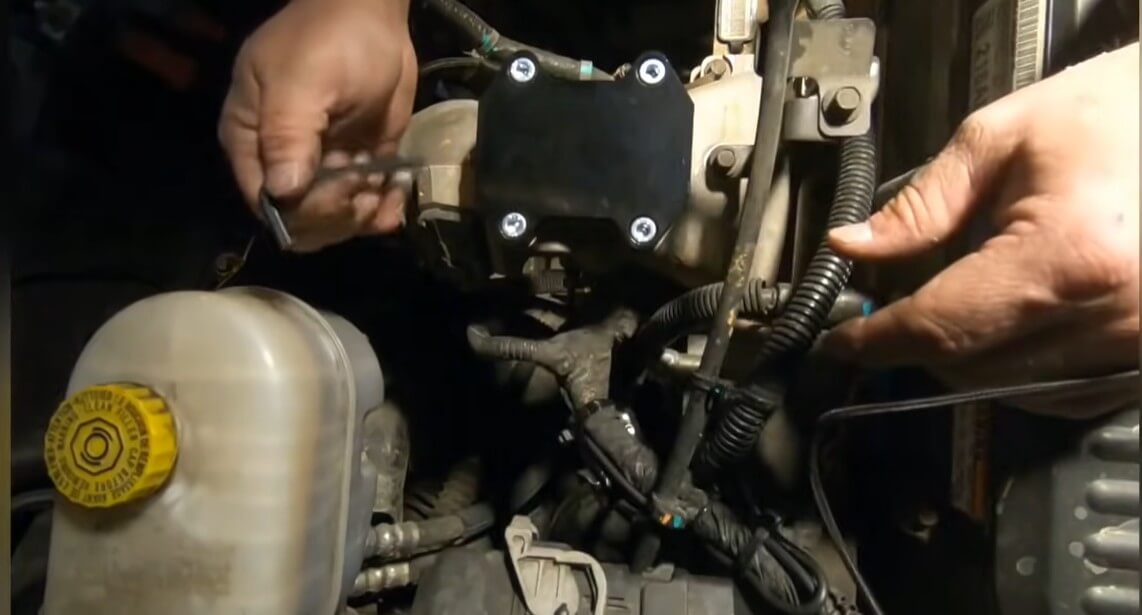
Okay. So what we’re going to do is first we’re going to take off the hood to cover so we’ll have eight millimeter bolts here here here in here: [: Music, ]. Okay, now, in order to get the cover off, we have to remove the engine oil dipstick and put this aside and the cover should the cover should come right off like so okay, so I have disconnected both negative leads on the battery, so I just want to Be safe! The next thing I’m going to do is I have to loosen up these V clamps right here and right here, you’re taking an 11 millimeter deep socket, because I want to end up removing all of this. This crossover pipe here so I’m going to go ahead and remove those clamps, so you’ll pack, these 11 millimeter boats, almost all the way to the end, and once you back them up something you’ll be able to turn these and then you’ll squeeze them together and it On clips and from there you can take them off like so now.
I’M gon na leave mine attached to this pipe here because, like I said, I’m just going to end up taking everything in a house and keeping it in case. Something goes wrong. So the next step is I’ve got to get to that bolt right there. It’S tricky, because it’s hard to get in from from the side over here like this, so what I’m doing is I’m kind of just bending this back a little bit. That was a pain in the butt.
I don’t know why my truck has to be different, but every video and everything I’ve consulted had you get the wrench come around and turn this well on my truck this is welded to this bracket, so I had to use an 8 millimeter to come underneath the Crossover pipe in between here and unscrew this from that side from the front side and I’ll tell you if I hadn’t had one of these ratcheting combination: wrenches I’d probably thrown my truck into the river, because it was just a pain in the butt: that’s okay! The next thing I’m going to do is take off. These four should be ten millimeter bolts. So again, I’ve already got this thing. Everything is already electrically disconnected don’t out.
Now we will take this off [ Music ], and it’s off all right. You see how kind of these gaskets one gasket came off with the unit and here’s the unit and the other stayed on there, so we’re going to okay. So what I’m going to do now is clean all this up. Try to take these off as neatly as I possibly can. I really don’t think I’ll be able to you, but then I’m just going to clean it all up, try to be careful not to get anything down in there.
I might take a piece of [ Music, ] paper, or some paper towel or whatever and put down in there is to keep the crap from going in there. Okay, so I’ve got these surfaces cleaned off pretty good. Now we want to put the cap on there. This particular camp already has the o-rings installed on it, so it’s basically just fit right over and then I’m going to use these Allen heads to [ Music, ] top them down. I’M gon na get them snug, but I’m not gon na overdo it.
I know the grade of these Allen heads they don’t seem like they would take too much torque and I don’t think it would taking very much torque. So I’m just going to Snug them down and then put an extra little bit on [, Music, ] and then after I get this one. I’M gon na give it just a little bit of torque, because I want to be snug good, stopping point there and then same there same there. There we have it that one that size done. This is the easy side, so there’s not too much to it.
Take off that horn and me everything up top knows that those four down, let’s move on to the little bit harder side now, hopefully I’ll, be able to keep my connection with GoPro, because I’m having sort of issues with it right now, but we’re going to keep Going here so the first thing I’m going to do is I’m going to take off the air box and the the tubing going down to the turbo. While I’m doing this Mar there’s two other mods, I’m going to do, I’m going to do my CC be delete and I go ahead and show that to you and I’m also going to take out that muffler in the turbo. That’S right down in there. Just to see how it sounds, I don’t think from what I’ve read: there’s not a whole lot that it does. Besides make the truck quieter.
I don’t really care about quiet and I’m running straight pipe. So go America! Okay! This is going to be the pain in the rear end. This is one we do a lot of cussing I’ll try not to, but I probably will I want to start by loosening up these three and then taking the airbox off and the tubing okay.
So I have loosen these three hold the fingers out right there. This hose clamp down in there, it’s an 8 millimeter, and now I’m going to unplug these two. This right here should just push down and wiggle off this one’s a little bit different. It’S got a double lock, so you have to push this part up and if it’s a [ Music ] there, you go that unlocks it. Now you can push this secondary, lock and unplug it as well.
Okay. So now I want to take this out, have unplugged everything up in here, careful with my light wire here so for those of y’all that don’t know me. I have the worst luck in the world as something bad can happen. It will happen. So what I did was it took a couple.
I put it over my turbo and I put some paper or some rubber bands around it. What that’ll do is hopefully keep things from going at. My turbo, like I said, terrible luck, and I also notice that I have an extra hose here. This hose right here is actually part of the CCV delete. I ran it here while back to see if I would get a code and I did.
I got a code and so I was going to wait so I got a programmer and everything so that I wouldn’t get the code for the CCV delete. So now I’ve got the hose ran and later on before, I put everything back together, I’m just going to disconnect the the hose from the turbo and connect it from here to protect it from here to this hose, which basically goes below the truck and down to The ground I am, I do have a catch can on order, because you know I do as much as possible want to do my part to keep things clean so I’ll. Just basically, whenever I change the oil I’ll change, the lot of the catch can as well. So I don’t just drop it everywhere, on the driveway and on the roads and stuff. So so the first thing we want to do is the first thing over here then I’m going to do the actual coolers, I’m gon na start taking off the heat shield.
So I’ll put some wd-40 on these two 10 millimeter bolts so and in a couple of other places around there just so they can be soaking in to hopefully make my job a little bit easier later on. So the next thing I’ve got a move. Remove. Is this piece which is attached to this black bracket by bracket? I see.
Has two bolts like your tins, we’ll see? Okay, this was a little tricky to get out. Basically, it stood. It was way underneath there you just got to pull it this way and then up it kind of wants to get in the way in this foil or whatever. It is heat shield around the sensor and but you just take it out and right now, I’m just going to lay it up on top to get to some other stuff.
I’M not gon na disconnect any of these cables or anything like that. Just going to lay it up there on top for now, and I want to put all these bolts back in there so that way, if I ever had to put it back together, I know where to go okay, so now I’m going to remove this heat shield Right here by removing that 10 millimeter nut and another one back behind here, okay, so that one there was a 10. These two down here are eight figure, you’re, probably smart enough to figure that out. Good luck wrestling it out, it’s kind of a pain, but it is doable okay, so the next part is I’m going to loosen this V clamp right here, it’s 11 millimeter. This will allow me to separate this part from the actual cooler, and then I’m also going to loosen up these.
click iamge to shop H&S Mini Maxx tuner
Those are 15 back here in the back that one I’m pointing out with my finger that one looks like it’s going to be a little bit of a pain in the butt to get to so again, that’s what that one looks like it might be: a pain In the butt to get to, but we’re going to see how we can do it so so just FYI the deep socket won’t fit on that. The way it’s positioned because there’s no way around it so figure out something else. I really hope the person that invented a ratcheting combination wrenches, I hope, they’re a rich person, because again this really saves me some headache. So, okay, this is the method I used to get down in there to that. I have a flex head, ratcheting combination, wrench and I used some wd-40.
I think the wd-40 was pretty important because I was trying to get it and trying to get it and it didn’t really want to break so I’ll put some wd-40 on it. Let it sit for a little bit and it broke so and as soon as you break it man, it’s it’s pretty pretty loose, so I’m gon na reach down in there with my hand and try to get the rest of it out. Alright. So that’s just like that off of there and that’s what’s left so I’m probably gon na do now is clean that up go ahead and put the plate on there to keep any gunk and crap from going down there. Alright, so I’m gon na take some paper towel just kind of put in there, so nothing gets chopped down in there.
I’Ve almost I’ve dropped several things that probably would have gone in my turbo go ahead and put that cover on there just to keep your junk from getting in there. That’S all it’s for. Let me clean up and all right. So this is that metallic washer gasket, whatever looks like there’s two of them there, I’m not gon na mess with it. I’M gon na clean up the surface area and drop a plate on there.
Okay, so we have two different plates. One has a hole with threaded. Already – and this plug really didn’t want to go in on this side, so I mean they both look pretty much the same, so I’ll put it in on this side. So that’s gon na go on the back, so I’m gon na put it to the side. Right now, this one it’s kind of hard to tell which side they went down, they’re both pretty much the same.
So I cleaned up the metal gaskets that I pulled off there and I’m gon na flip a coin and just hope I get the right one. This one looks a little rougher than that one, so I’m gon na put that side down and I’m going to reuse the same nuts that I pulled off there. It looks like this one doesn’t want to go all the way down. See it’s just like the threads. Are strips?
Oh, that’s my damn I told y’all I got the worst look in the world. Didn’T! Oh! I know I need to strip those threads Wow. Alright, GoPros letting me down here so we’ll go.
Show y’all. This one was stripped just a little bit on those threads down there. You can probably see it just, but that bolt went right past it. This one went right past it and tighten them down pretty good use the same metal gasket that came off there and snug them down. So the next thing I’m going to do is take out this bolt this one, this one on top and the one underneath it way back there in the back.
But before I do all that, I’m going to have to disconnect the CCV and the this one going across here, which is coolant just built a little different than I’ve seen, but just so y’all know I have a drain something or another to catch the coolant up. There underneath the turbo – I think, that’s where most of the coolant is going to come out. Okay, taking the back in lifting it up, pushing it back at it this thing and pulling it all out. So now I had to undo this bracket to move it out. The way so now what goes where and how this is gon na be fun so for now I’ll get that we’ll put that plate on back there just kind of clean it off.
Remember it goes like this cause. It’S got the plug in it. That way, if you ever want to stick, I think it’s an eg T if you want to stick your EGT probe in there and you can so for something drops down in there. I’M gon na put the plate on okay, [, Music ]. This big thing right here right other bracket to fit in there now there’s kind of tricky cuz.
You can see where my ratchets on that’s a 13 and then there’s another one right back there, so it’s like somewhere up in here underneath. So you can’t easily see these, so it’s like, I think, underneath there somewhere, you can’t easily seal so yeah kind of a challenge. But let’s see what we can, let’s see what damage we can do. [, Music, ], eight mill there. So let’s break it right here.
It holds this thing on an eight millimeter on the other side and I’m sorry, ten millimeter, that’s an 8 10 millimeter on the other side. What’S up big old heavy piece, that thing is heavy yeah. I can see more of the engine. Okay, so what I’m gon na do now is install this plate and the plate is going to mount bolt. So it’s a 13 millimeter, I’m gon na pull it out.
So you’ll see what I’m talking about. When I say it’ll extend out, let’s go actually it’s gon na be like this spacer. Then the 15 is gon na screw on in all the way like. So then it will get reinstalled kind of the way it was you’re. Gon na be talking on this thing and this nut and then you’re gon na screw that onto here like so and then your racket will mount into there.
So well, I don’t know where they go pro stops, but it was. I removed this stud out. They had a double stud, with threads on one side and threads. On the other side, I put this 15 millimeter all the way down to one side and screwed it in use the spacer that came with it. That came on the came with the truck and the existing spacer.
So now I’m going to mount the that’s the right one, I’m going to mount the bracket loosely into that black stud there and I told y’all that I have the worst luck in the world now. This plate that I got is blank nothing there. So what that does is it so I’m going to and all that all 13 millimeters? Okay. So to do my CCV delete, I ran my hose down to the bottom of the truck where the oil drain would be.
It’S completely out of the way like it that way, and I want to be able to bypass the bracket here all together and just take that bracket off. So it can be out of the way. Then I might be able to move this bracket over to where currently this bracket is being so putting on existing hose clamp on just going to put it right up there and now I’ve got that CCV delete done now, I’m going to take this bracket off and Put it with my junk okay, so I have completed the CCB newly rerouted, my coolant. I’Ve got to fill it up, fill up my coolant. I have reattached everything to the bracket drop.
All my tools on to the seriously I’m going to tape up all the connectors, and so that way they do a lot of hunting and I go muddin and I’m just going to take all these up. So that way they don’t get dirty, and so they prolong the life of the connectors and the truck and all that get stuff. But we’ve got a lot of these things just kind of hanging out now, so I want to keep them away from anything hot and play as if tom and take them up zip Tom to the to the brackets and stuff. So so the I think the biggest takeaway from all this. Yes for me, that’s to put that towel over there and and just rubberband it around you know, put some rubber bands so that way, there’s nothing that goes in your turbo man.
You can see that it’s just waiting for something just to bounce up in there and damage your turbo. So now, I’m gon na put everything all back together. At least someone. Try is definitely some oil in there on the turbo, okay, everything back together, breather on put some coolant in there just to make it for whatever I lost. I put a little bit too much but see CV crossover plugs all plug back up that one temperature, since you’re up put my straw back on just kind of still get tools out of it, look and see.
If I can spot any of these nuts and bolts that went down there, I think I’ve got them all accounted for, but, except for one, ten millimeter bolt came out of the EGR cooler, [ Music ]. A couple of lessons learned that pipe or that feeding right here yeah, I ended up cutting that whole bracket off uses. Some zip ties because that got separated. You see the zip ties there that helps hold those two together, the underneath there you can see where I put that bracket straight across use an angle grinder and I’m just going to paint it to keep it from rusting. So just a couple of things to keep note of that, I did change that bracket, as it turned out, was from a 2012 model, and this is a 16.
 heyo, so the purpose of this video is to show you that you don’t have to be mechanic to perform an EGR delete, a CC, be delete or a DPF delete, and you don’t have to pay somebody five hundred dollars or more to do it. I am by no means anywhere close to being a mechanic. I changed my own old associated filters. I have a very basic understanding of engines and I know how to use a wrench. That’S all.